
The Puebloan People have a fantastic culture and artistic history that spans 7000 years.
After reading about the culture of the Puebloan People scroll down for an art project that explores the unique forms of a Pueblo village.


Step - By - Step

Make Template
Draw template of Pueblo village roof line onto thicker/stiffer paper. It should be thicker than construction paper. Thinner cardboard works. Carefully cut out template.

Choose Colors
Choose 3 colors for your village. Darker to lighter. The 1st color should be the darkest . Start the first village layer on the bottom third of the paper. It may be easier to turn your picture upside down like in the image above. Hold template down firmly. If it comes out of place, reposition before applying color. Rub downwards away from the template.

Blend With Tissue
Take your tissue paper and rub away from your template towards the bottom of the paper. Make sure your template is held securely in place. You should always have the template in place for applying color or blending with the tissue paper!

Do It Again
After the first section of you Pueblo village is complete, move your template up to the middle section of your paper. Choose your middle range color and repeat steps two and three.

Third Section and Sharpie
The third section will be completed in the top third of your paper, just like the other two but using your last color. After this is done, take a sharpie and outline the different section’s roof lines. You can also add 4 or 5 dots near the roof of a few buildings. These represent the extended roof rafters that are visible from the outside.
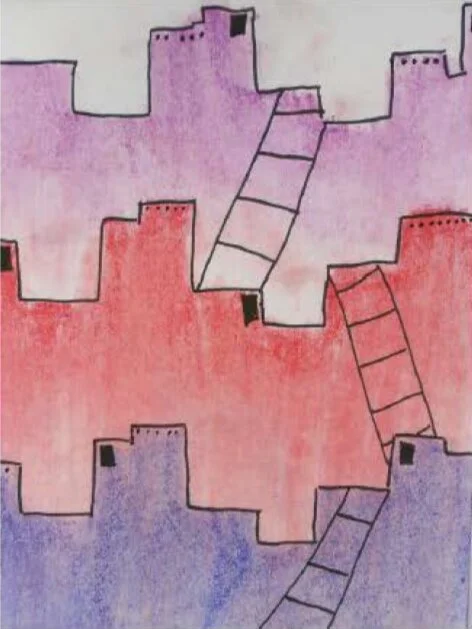
Ladders and Windows
After you outline your roof lines you can add ladders in each section and windows. Keep rectangular windows to a minimum. This was a safety issue in order to shield the villages from attack by other tribes. If you find your sharpie is picking up too much chalk dust you can easily wipe it off with a tissue. There you have it. You have made a beautiful Pueblo village! Now, if you feel like it, you can add villagers to your buildings.

Here are some great stick figure gesture drawings. Use some to inhabit your Pueblo village drawing!